

One of the more useful things MVC includes is Unobtrusive Validation with the usage of the jQuery Validate plugin and the Unobtrusive library. This lightweight library allows us to add validation to our MVC views without any additional client-side coding; we only have to use attributes like [Required]and [Range] and include the correct script files.
In this post, we'll take a look at a simple example of how to use Unobtrusive Validation, and break down how it actually works.
What Does "Unobtrusive Validation" Mean?
It means that we can implement simple client-side validation without writing a ton of validation code, and that we can improve the user experience simply by adding the appropriate attributes and including the appropriate script files.
Consider the view model AddUserVM (we will use this in the sample project):
public class AddUserVM
{
    [DisplayName("First Name:")]
    [Required(ErrorMessage = "Please enter the first name.")]
    public string FirstName { get; set; }

    [DisplayName("Last Name:")]
    [Required(ErrorMessage = "Please enter the last name.")]
    public string LastName { get; set; }

    [DisplayName("Age:")]
    [Range(12, 120, ErrorMessage = "You must be between 12 and 120 years of age.")]
    public int Age { get; set; }

    [DisplayName("Email:")]
    [Required(ErrorMessage = "Please enter an email address.")]
    [EmailAddress(ErrorMessage = "Please enter a valid email address.")]
    public string EmailAddress { get; set; }
}
This class is already set up to handle server-side validation using attributes. Unobtrusive Validation allows us to take the already-existing validation attributes and use them client-side to make our user experience that much nicer.
The Unobtrusive script files are included automatically with new MVC projects in Visual Studio, but if you don't have them you can get them from NuGet.
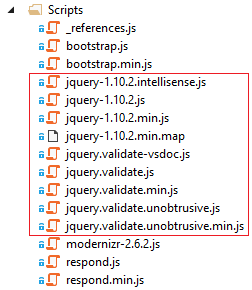
We need three sets of files to implement Unobtrusive:
- The jQuery library
- The jQuery Validate plugin
- The Unotrusive extensions to Validate
Once we've got those, we can add unobtrusive validation to any page by simply including those script files on that page. Even better, we can use MVC's bundling feature to just create and use a bundle, which is what happens by default in a new MVC app:
public static void RegisterBundles(BundleCollection bundles)
{
    bundles.Add(new ScriptBundle("~/bundles/jquery").Include(
                "~/Scripts/jquery-{version}.js"));

    bundles.Add(new ScriptBundle("~/bundles/jqueryval").Include(
                "~/Scripts/jquery.validate*"));
}
Now, all we have to do is place that bundle on the appropriate view to enable unobtrusive validation.
OK, that seems reasonable. But how does it actually work?
How Does It Work?
Let's first look at what happens without Unobtrusive Validation. Say we have this view:
@model UnobtrusiveDemo.ViewModels.Home.AddUserVM

@{
    ViewBag.Title = "Add a User (Server-Side)";
}

<h2>Add a User (Server-Side Validation)</h2>

@using (Html.BeginForm())
{
    <div>
        <div>
            @Html.LabelFor(x => x.FirstName)
            @Html.TextBoxFor(x => x.FirstName)
            @Html.ValidationMessageFor(x => x.FirstName)
        </div>
        <div>
            @Html.LabelFor(x => x.LastName)
            @Html.TextBoxFor(x => x.LastName)
            @Html.ValidationMessageFor(x => x.LastName)
        </div>
        <div>
            @Html.LabelFor(x => x.Age)
            @Html.TextBoxFor(x => x.Age)
            @Html.ValidationMessageFor(x => x.Age)
        </div>
        <div>
            @Html.LabelFor(x => x.EmailAddress)
            @Html.TextBoxFor(x => x.EmailAddress)
            @Html.ValidationMessageFor(x => x.EmailAddress)
        </div>
        <div>
            <input type="submit" value="Save" />
        </div>
    </div>
}
Our controller actions look like this:
[HttpGet]
public ActionResult ServerSide()
{
    AddUserVM model = new AddUserVM();
    return View(model);
}

[HttpPost]
public ActionResult ServerSide(AddUserVM model)
{
    if(!ModelState.IsValid) //Check for validation errors
    {
        return View(model);
    }
    return RedirectToAction("Index");
}
The POST action is super simple; we check for validation errors, and if there are any, we simply return the view.
Disabling Client-Side Validation in the Web.Config
We can disable client-side validation in the entire app via the Web.config file, by setting the AppSetting for ClientValidationEnabled to false:
<appSettings>
    ...
    <add key="ClientValidationEnabled" value="false"/>
    ...
  </appSettings>
With client-side validation disabled, let's see what HTML this renders for the FirstName property:
<div>
    <label for="FirstName">First Name:</label>
    <input id="FirstName" name="FirstName" type="text" value="">
</div>
If we attempt to submit this form, the Controller catches the errors in its action and we get this HTML:
<div>
    <label for="FirstName">First Name:</label>
    <input class="input-validation-error" id="FirstName" name="FirstName" type="text" value="">
    <span class="field-validation-error">Please enter the first name.</span>
</div>
Because this input failed validation, we are now rendering the Validation Message as well as placing an error message CSS class on the input.
What happens if we turn client side validation back on? Before submitting the form, we get this HTML:
<div>
    <label for="FirstName">First Name:</label>
    <input data-val="true" data-val-required="Please enter the first name." id="FirstName" name="FirstName" type="text" value="">
    <span class="field-validation-valid" data-valmsg-for="FirstName" data-valmsg-replace="true"></span>
</div>
Now we've got some interesting new attributes to look at:
- data-val specifies that this input needs validation.
- data-val-required is the error message to be displayed if a value is not provided.
- data-valmsg-for is the name of the input associated to the error message(s) being displayed.
- data-valmsg-replace specified whether error messages are to be replaced within this element.
This is part of the magic of Unobtrusive: it uses HTML5-compatible "data-" attributes to store all of the information it needs to perform validation. This is why you don't need to use any other code besides attributes to enable client-side validation with this library.
Of course, so far all the validation we've been doing so far in this demo has been server-side. To enable client-side validation, we have to include the "jquery.validate.unobtrusive" bundle in our view. In our sample project, we have another view that shows how this could work:
@model UnobtrusiveDemo.ViewModels.Home.AddUserVM

@{
    ViewBag.Title = "Add a User (Unobtrusive)";
}

<h2>Add a User (Unobtrusive Validation)</h2>

@using (Html.BeginForm())
{
    <div>
        <div>
            @Html.LabelFor(x => x.FirstName)
            @Html.TextBoxFor(x => x.FirstName)
            @Html.ValidationMessageFor(x => x.FirstName)
        </div>
        <div>
            @Html.LabelFor(x => x.LastName)
            @Html.TextBoxFor(x => x.LastName)
            @Html.ValidationMessageFor(x => x.LastName)
        </div>
        <div>
            @Html.LabelFor(x => x.Age)
            @Html.TextBoxFor(x => x.Age)
            @Html.ValidationMessageFor(x => x.Age)
        </div>
        <div>
            @Html.LabelFor(x => x.EmailAddress)
            @Html.TextBoxFor(x => x.EmailAddress)
            @Html.ValidationMessageFor(x => x.EmailAddress)
        </div>
        <div>
            <input type="submit" value="Save" />
        </div>
    </div>
}

@section Scripts
{
    @Scripts.Render("~/bundles/jqueryval")
}
The only difference between the ServerSide view from earlier and this Unobtrusive view is the inclusion of the jqueryval bundle on the latter.
What we will see now is that with the script included and the ClientValidationEnabled property set, the validation will fire client-side in addition to server-side. This means that the browser doesn't make a round-trip to the server on validation failure, and that the user gets a nicer experience out of it.
Client-Side vs Server-Side Validation - Do We Need Both?
Absolutely! In fact, we only actually need server-side validation, since client-side can be disabled by the browser. However, handling both scenarios provides a nice graceful degradation where the user will still get the validation they need, in the nicest way their browser provides.
Check out the sample project on GitHub, and let me know what you think about this demo in the comments!
 exceptionnotfound
Happy Coding!