When dealing with objects in an MVC app, we often want a way to specify how that object should be displayed on any given page. If that object is only displayed on one page, we simply write HTML and CSS to lay out and style how that object should be shown to the user. However, what if that object should be shown in multiple places, with the same format? We'd need some kind of standardized layout.
ASP.NET MVC has made this kind of standardization easy to do with the inclusion of display and editor templates. Let's walk through these features.
The Sample Project
As with a great many of my tutorial posts, this post has a sample project over on GitHub that contains the code we're going to write. Check it out!
What are Templates For?
In short, display and editor templates are used to standardize the layout shown to the user when editing or displaying certain types or classes. For example, we might want to specify that an Address object must always be displayed with the street name on its own line, then the city/state/postal code on the next line. They're a perfect way to uphold DRY principles in your MVC app.
The Setup
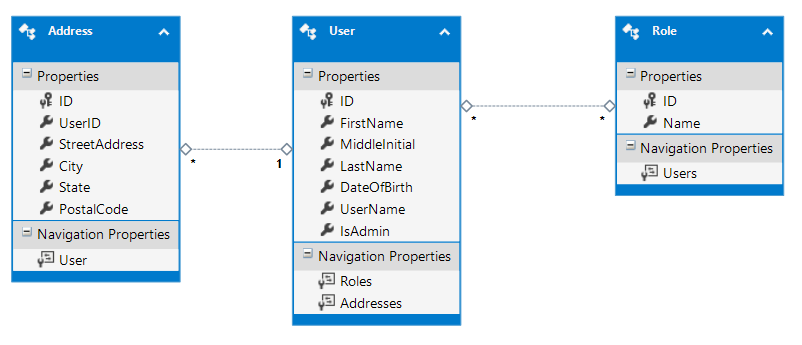
We'll be using a sample database for this, and the schema for that database looks like this:

Here's some classes we'll be using (they are Entity Framework generated classes in the sample project, but here I've removed extras like navigation properties for clarity):
public class User
{
    public int ID { get; set; }
    public string FirstName { get; set; }
    public string MiddleInitial { get; set; }
    public string LastName { get; set; }
    public DateTime DateOfBirth { get; set; }
    public string UserName { get; set; }
    public bool IsAdmin { get; set; }
}

public class Role
{
    public int ID { get; set; }
    public string Name { get; set; }
}

public class Address
{
    public int ID { get; set; }
    public int UserID { get; set; }
    public string StreetAddress { get; set; }
    public string City { get; set; }
    public string State { get; set; }
    public string PostalCode { get; set; }
}
We'll be using this schema and these classes to show how we can use display and editor templates.
Display Templates
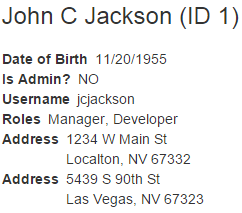
Let's say we have a view Home/Index, and on that view we want to display each user in the database, along with their roles and addresses if they have any. We want it to look like this:

While we can write the HTML to do that layout on the Home/Index view itself, we've noticed that there are some other views in this application that also display users, and maybe it would be better to create a standardized layout for these users wherever they need to be displayed. We can accomplish this using display templates.
A display template is simply a partial view that is model-bound to the object it wants to display, and exists in the Views/Shared/DisplayTemplates folder (though you can also put it in Views/ControllerName/DisplayTemplates). Further, the name of the view (by default) should be the name of the object you want to use it as the template for.
First let's create the simplest display template in this project. We want to always display dates in the ISO standard format yyyy-MM-dd. Let's create a display template for the DateTime object that will force these dates to display in that format.
Views/Shared/DisplayTemplates/DateTime.cshtml
@model System.DateTime
<span>
    @Model.ToString("yyyy-MM-dd")
</span>
We'll use this partial in just a second when we create the partial for User. For now let's take a look at a simple display template for a user-created object, the one for Address:
Views/Shared/DisplayTemplates/Address.cshtml
@model DisplayTemplatesDemo.DataAccess.Model.Address
<div>
    @Model.StreetAddress <br />
    @Model.City, @Model.State @Model.PostalCode
</div>
All we've done is specified how we want Address objects and DateTime structs to be laid out when they are displayed to the user. We'll use each of these display templates inside another display template, the one for User:
Views/Shared/DisplayTemplates/User.cshtml
@model DisplayTemplatesDemo.DataAccess.Model.User

@{
    string allRoles = "";
    foreach (var role in Model.Roles)
    {
        allRoles += role.Name + ", ";
    }
    if (allRoles.Contains(","))
    {
        allRoles = allRoles.Remove(allRoles.LastIndexOf(","));
    }
}

<div style="display:table-row">
    <h3>@Model.FirstName @Model.MiddleInitial @Model.LastName (ID @Model.ID)</h3>
    <div>
        <dl class="inline">
            <dt><strong>Date of Birth</strong></dt>
            <dd>@Html.DisplayFor(x => x.DateOfBirth)</dd> //Display Template for DateTime
            <dt><strong>Is Admin?</strong></dt>
            <dd>@(Model.IsAdmin ? "YES" : "NO")</dd>
            <dt><strong>Username</strong></dt>
            <dd>@Model.UserName</dd>
            <dt>Roles</dt>
            <dd>@(String.IsNullOrWhiteSpace(allRoles) ? "NONE" : allRoles)</dd>
            @foreach(var address in Model.Addresses)
            {
                <dt>Address</dt>
                <dd>@Html.DisplayFor(x => address)</dd> //Display Template for Address
            }
        </dl>
    </div>
</div>
The really interesting part of all this comes now. We have to call that display template on our view, and we can use one of two methods to do that:
DisplayFor call the display template for the type of the property selected (e.g. Html.DisplayFor(x => x.PropertyName). You'll notice that we are already using DisplayFor in the User display template to call the corresponding display template for the Address object and the DateTime struct.
DisplayForModel calls the display template for the @model of the view, and that's what we're going to use on our Home/Index view:
Views/Home/Index.cshtml
@model List<DisplayTemplatesDemo.DataAccess.Model.User>

<h1>Users</h1>

@Html.DisplayForModel()
That's all we have to do! Now we're done with the display templates for the User class.
Let's see another example. Say we want to have a list of all the Roles, and the number of users in each role. Let's further say that each role name should be a link to the Edit view for the roles. We want this Role display to look like this:

Let's make a display template for the Role class.
Views/Shared/DisplayTemplates/Role.cshtml
@model DisplayTemplatesDemo.DataAccess.Model.Role
<h3>@Html.ActionLink(Model.Name, "Edit", new { id = Model.ID }) @Html.ActionLink("(" + Model.Users.Count + " Users)", "User", new { id = Model.ID })</h3>
And now we can also make the Role/Index view:
Views/Role/Index.cshtml
@model List<DisplayTemplatesDemo.DataAccess.Model.Role>

<h1>Roles</h1>

@Html.ActionLink("Add a Role", "Add")

@Html.DisplayForModel()
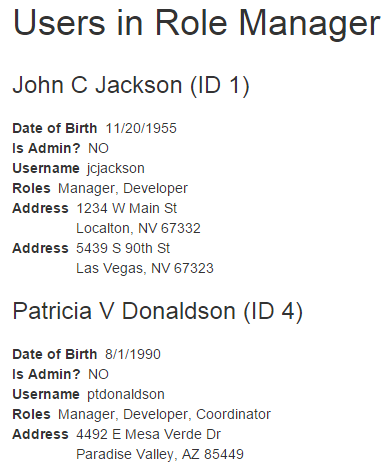
Let's try one last demo where we can see the real usage of display templates. Say we want to list all users in a given role:

We can just build the Role/User view and use the already-existing User display template:
Views/Role/User.cshtml
@model DisplayTemplatesDemo.ViewModels.Role.UserRoleVM

<h1>Users in Role @Model.Role.Name</h1>

@Html.DisplayFor(x => x.Users)
In short, use Display Templates when you need to standardize how an object should look when displayed on a view.
Editor Templates
We've seen how display templates can be used to standardize the layout of an object, so let's now see how we can do the same thing for these objects when editing them. Just like display templates, there's two ways to call editor templates for a given type:
Editor templates, similarly to display templates, need to exist in either Views/Shared/EditorTemplates or Views/ControllerName/EditorTemplates. For this demo, we'll be creating them in the Shared folder.
Let's see some samples! First, we need an editor template for Role:
Views/Shared/EditorTemplates/Role.cshtml
@model DisplayTemplatesDemo.DataAccess.Model.Role

<div>
    <label>Name: </label>
    @Html.TextBoxFor(x => x.Name)
</div>
Then, we can simply call EditorForModel on the Role/Add view:
Views/Role/Add.cshtml
@model DisplayTemplatesDemo.DataAccess.Model.Role

<h2>Add a Role</h2>

@using(Html.BeginForm("Add", "Role", FormMethod.Post))
{
    @Html.EditorForModel()
    <input type="submit" value="Save" />
}
Simple, right? How about for adding a User? Users have a DateOfBirth property of type DateTime, and we want to ensure that every time we have a DateTime we display an <input type="date">, so let's create an editor template for DateTime:
Views/Shared/EditorTemplates/DateTime.cshtml
@model System.DateTime
@Html.TextBoxFor(x => x, new { type = "date" })
Now we can create the editor template for User:
Views/Shared/EditorTemplates/User.cshtml
@model DisplayTemplatesDemo.DataAccess.Model.User

<div>
    <div>
        <label>First Name:</label>
        @Html.TextBoxFor(x => x.FirstName)
    </div>
    <div>
        <label>Middle Initial:</label>
        @Html.TextBoxFor(x => x.MiddleInitial, new { length = 1 })
    </div>
    <div>
        <label>Last Name:</label>
        @Html.TextBoxFor(x => x.LastName)
    </div>
    <div>
        <label>Date of Birth:</label>
        @Html.EditorFor(x => x.DateOfBirth) //Editor Template for DateTime
    </div>
    <div>
        <label>UserName: </label>
        @Html.TextBoxFor(x => x.UserName)
    </div>
    <div>
        @Html.CheckBoxFor(x => x.IsAdmin)
        <label for="IsAdmin">Admin</label>
    </div>
</div>
Note the use of EditorFor on this template. If we were to use EditorFor on a primitive type, MVC will simply display the bext <input> for that type (usually it'll be a text box).
Finally, we call EditorForModel on the User/Add view:
Views/User/Add.cshtml
@model DisplayTemplatesDemo.DataAccess.Model.User

<h2>Add a User</h2>

@using(Html.BeginForm("Add", "Home", FormMethod.Post))
{
    @Html.EditorForModel()
    <input type="submit" value="Save" />
}
In short, use editor templates when you need to standardize how the layout of a class should look when editing that class.
Summary
Display and editor templates are great ways to standardize the look of your site for given classes. As always, I've got a sample project on GitHub that demos these concepts, using Entity Framework and MVC5.
For a bit more info, check out Professional ASP.NET MVC 5, specifically Chapter 3 (Views) and Chapter 15 (Extending MVC).
Happy Coding!


