ASP.NET Core 2.0 was released just a few weeks ago, and included a new feature that may be the biggest single addition to ASP.NET Core since it was announced: Razor Pages! Come along with me as we figure out what Razor Pages are for, how they are used, and why they might be a helpful addition to our development toolbox.
What are Razor Pages?
Razor Pages are a new feature in ASP.NET Core 2.0, and are designed to make coding page scenarios much quicker than they are in the regular model-view-controller (MVC) pattern.
Page scenarios are generally those in which you would be coding up a <form> of any kind, whether the raw HTML kind or using the Razor @Html.BeginForm(). More generally, they are scenarios in which the entire functionality of the page, from properties needed to methods available, will be assigned to a Page Model or other model and will not be split into separate Controllers and View Models, as often happens in raw MVC. This keeps related functionality in close proximity, which improves cohesiveness.
In other words, Razor Pages appears to be Web Forms done right.
The most importantly thing to know about Razor Pages is that they are built on top of ASP.NET Core MVC, not beside it, and so all the goodness from ASP.NET MVC applications (routing, ModelState, etc.) you can still access in Razor Pages apps.
Creating a Project
In order to use ASP.NET Core Razor Pages, you will need ASP.NET Core 2.0 installed on your machine. You can do that from Microsoft's download page or upgrade your installation of Visual Studio to version 15.3.
The rest of this tutorial assumes that you are using Visual Studio. The concepts remain the same no matter what IDE (if any) you use, but the details may be a bit different.
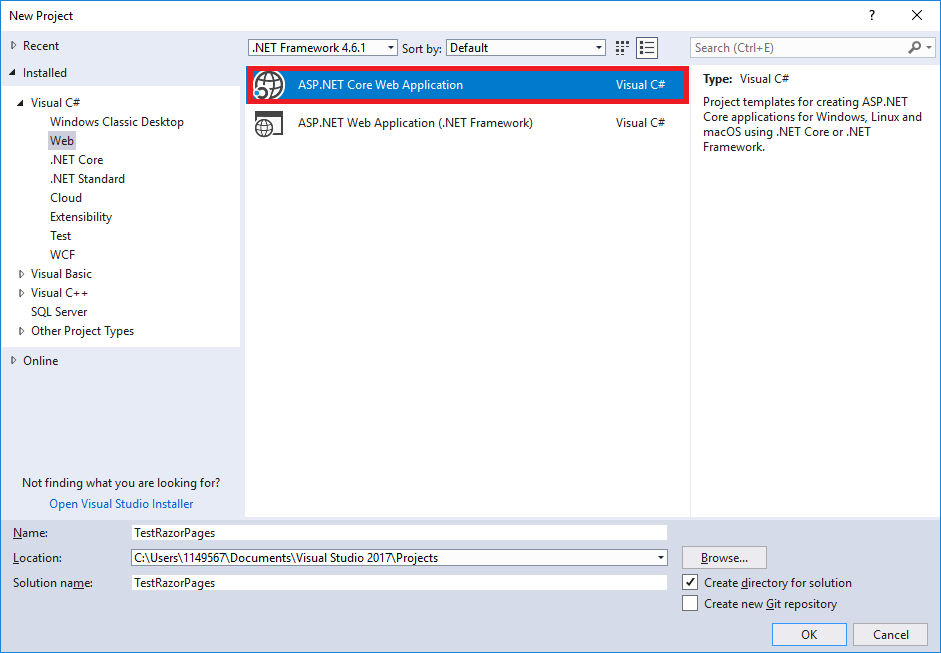
In Visual Studio, you can create a new ASP.NET Core Razor Pages project by selecting File -> New Project and selecting ASP.NET Core Web Application:
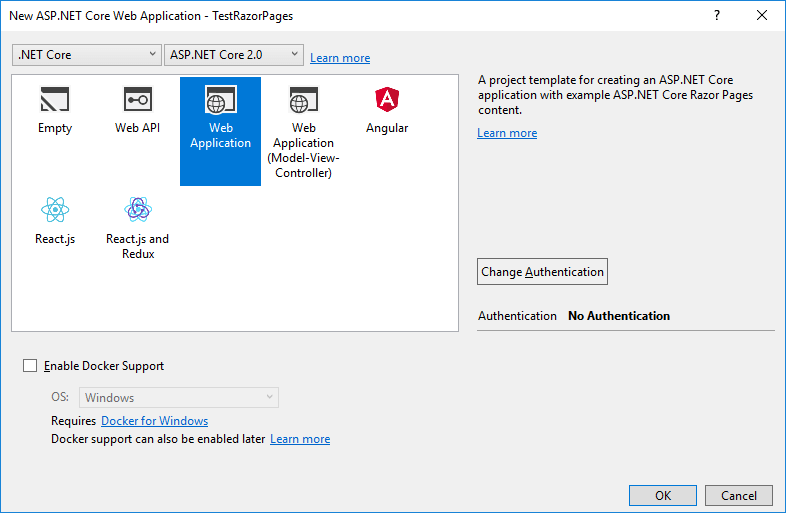
Now, select Web Application and click OK to create the project:
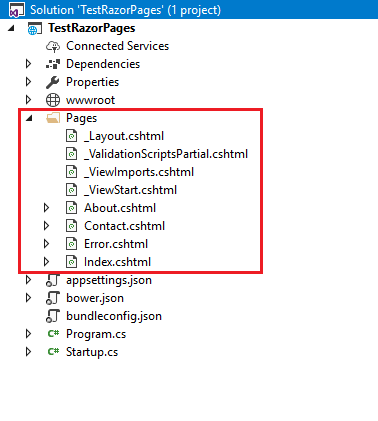
Visual Studio will then create a new project that has a very similar layout to other ASP.NET Core Web projects, with one significant difference: the addition of a Pages folder:
Now we have a brand-new Razor Pages app, so let's lay some groundwork to show the power of Razor Pages.
Setting Up the App
Skip this section if you don't need to know how my particular sample app works behind-the-scenes.
The first thing we need to do is setup a mock Repository to hold our data. For this sample project, we'll use Employees, and the following Employee class, an IEmployeeRepository interface and the EmployeeRepository implementation.
public class Employee
{
    [DisplayName("First Name:")]
    [Required(ErrorMessage = "Please enter the employee's first name")]
    public string FirstName { get; set; }

    [DisplayName("Last Name:")]
    [Required(ErrorMessage = "Please enter the employee's last name")]
    public string LastName { get; set; }

    [DisplayName("Date of Birth:")]
    [DataType(DataType.Date)]
    public DateTime DateOfBirth { get; set; }

    [DisplayName("ID:")]
    [Required(ErrorMessage = "Please enter the employee's ID")]
    public int ID { get; set; }
}

public interface IEmployeeRepository
{
    Employee GetByID(int id);
    List<Employee> GetAll();
}

public class EmployeeRepository : IEmployeeRepository
{
    public List<Employee> GetAll()
    {
        List<Employee> employees = new List<Employee>();
        employees.Add(GetByID(1));
        employees.Add(GetByID(2));
        employees.Add(GetByID(3));
        return employees;
    }

    public Employee GetByID(int id)
    {
        if(id == 1)
        {
            return new Employee()
            {
                FirstName = "Spencer",
                LastName = "Strasmore",
                DateOfBirth = new DateTime(1978, 11, 16),
                ID = 1
            };
        }
        if(id == 2)
        {
            return new Employee()
            {
                FirstName = "Ricky",
                LastName = "Jerret",
                DateOfBirth = new DateTime(1989, 3, 30),
                ID = 2
            };
        }
        if(id == 3)
        {
            return new Employee()
            {
                FirstName = "Vernon",
                LastName = "Littlefield",
                DateOfBirth = new DateTime(1992, 7, 3),
                ID = 3
            };
        }

        return null;
    }
}
All these classes are doing is mocking a data access layer so we can demo how to modify it.
The last thing we need to do is place the EmployeeRepository in ASP.NET Core's native DI container, which we can do by modifying the Startup.cs file:
public void ConfigureServices(IServiceCollection services)
{
    services.AddTransient<IEmployeeRepository, EmployeeRepository>();
    ...
}
We are now ready to build some Razor Pages!
Building the Index Page
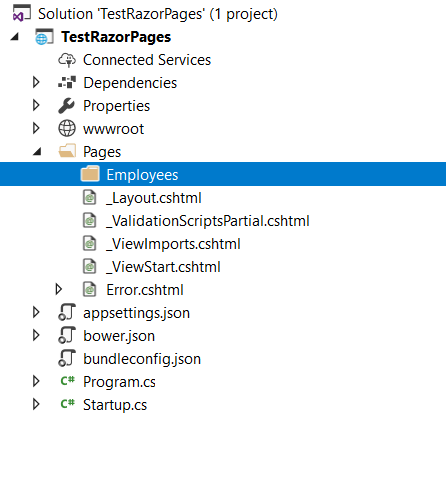
Now we are ready to add a new Razor Page, which will list all of our employees. For this demo, and to demonstrate some features later in the tutorial, we will add these new pages to an Employees folder under the Pages folder, like so:
Now we can right-click the Employees folder and select Add -> New Item to get a popup that looks like this:
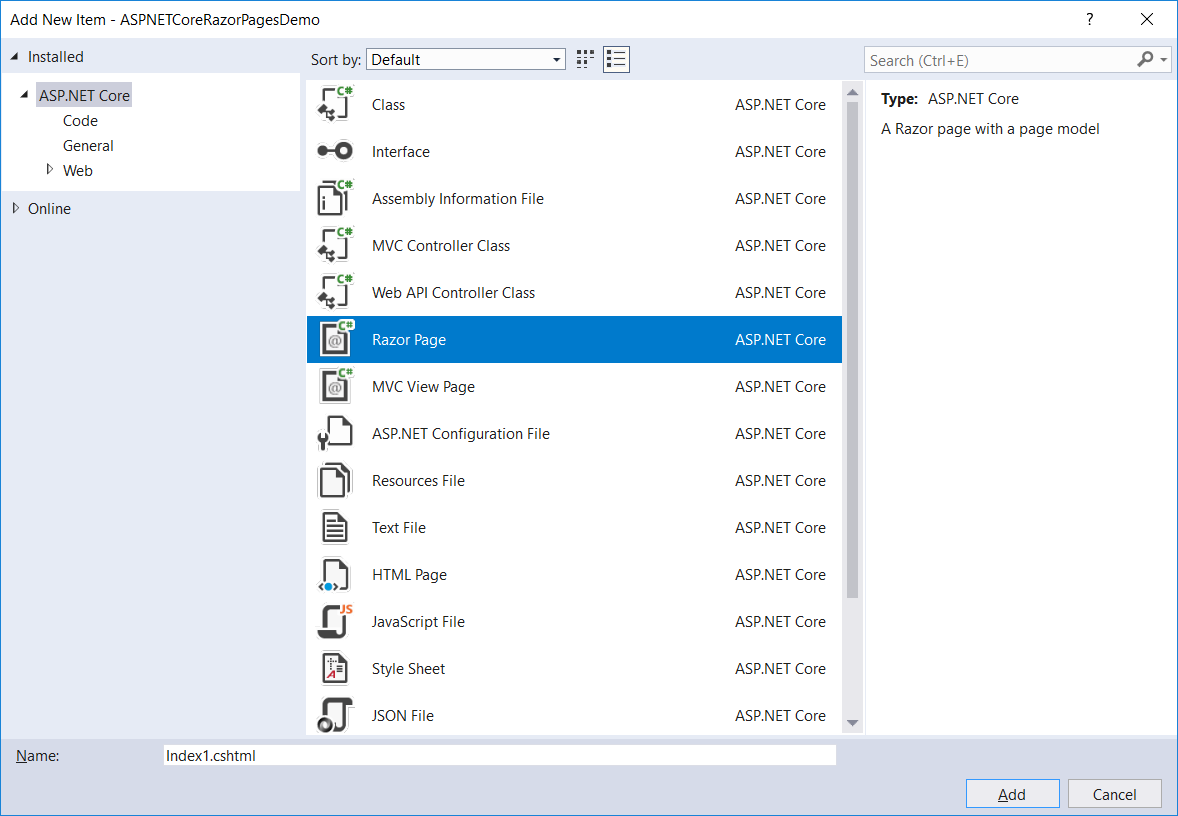
We want to add a new Razor Page, so select that, name the page "Index" and click OK. Visual Studio will add a new Index.cshtml file and a new Index.cshtml.cs file.
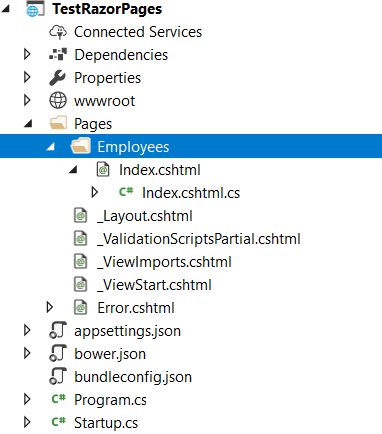
This will become the landing page for our app; we'll set that in the next section. For now, let's take a look at the default markup in the Index.cshtml file.
@page
@model IndexModel
@{
}
Well, that's a whole lot of nothing, isn't it? The @page directive tells ASP.NET Core to treat this page as a Razor Page, and the @model directive tells ASP.NET Core to bind this page to an instance of IndexModel.
But where does IndexModel exist? In the Index.cshtml.cs file:
public class IndexModel : PageModel
{
    public void OnGet()
    {
    }
}
Notice the new OnGet() method. This method is standard in Razor Pages for GET operation; as we progress through this tutorial we will see a few examples of how to use this method.
Now that we have our page, how do we get it to show all our employees?
Show Employees
First, we need to modify the IndexModel class to have a property which represents the Employees we want to display, as well as changing the OnGet() method to load the employees from the data source.
public class IndexModel : PageModel
{
    private IEmployeeRepository _employeeRepo;
    public List<Employee> Employees { get; set; }

    public IndexModel(IEmployeeRepository userRepo)
    {
        _employeeRepo = userRepo;
    }
    public void OnGet()
    {
        Employees = _employeeRepo.GetAll();
    }
}
Now, let's write markup on the Index.cshtml page to display these employees.
@page
@using ASPNETCoreRazorPagesDemo.Pages.Employees

@model IndexModel

<h2>Employees</h2>

<a asp-page="Add">Add an Employee</a>

<h3>@Model.Message</h3>

<table>
    <thead>
        <tr>
            <th>
                Name
            </th>
            <th>
                Date of Birth
            </th>
            <th>
                Employee ID
            </th>
            <th></th>
        </tr>
    </thead>
    <tbody>
        @foreach(var employee in Model.Employees)
        {
            <tr>
                <td>
                    @(employee.FirstName + " " + employee.LastName)
                </td>
                <td>
                    @employee.DateOfBirth.ToShortDateString()
                </td>
                <td>
                    @employee.ID
                </td>
                <td>
                    <a asp-page="Edit" asp-route-id="@employee.ID">Edit</a>
                </td>
            </tr>
        }
    </tbody>
</table>
The Add and Edit links and the Message display will come in handy in the next few sections.
Now that we've got an Index page to list all our employees, let's build an Add page to add new ones.
Building the Add Page
Just like before, add a new Razor Page to the Employees folder and call it Add. We'll get the same default markup and code as in the last section.
Let's change the markup on this page to resemble an Add form:
<h2>Add an Employee</h2>
<a asp-page="Index">Back to Employees</a>

<form method="post">
    <div>
        <div>
            <label asp-for="Employee.FirstName"></label>
            <input type="text" asp-for="Employee.FirstName" />
            <span asp-validation-for="Employee.FirstName"></span>
        </div>
        <div>
            <label asp-for="Employee.LastName"></label>
            <input type="text" asp-for="Employee.LastName" />
            <span asp-validation-for="Employee.LastName"></span>
        </div>
        <div>
            <label asp-for="Employee.DateOfBirth"></label>
            <input type="text" asp-for="Employee.DateOfBirth" />
            <span asp-validation-for="Employee.DateOfBirth"></span>
        </div>
        <div>
            <label asp-for="Employee.ID"></label>
            <input type="text" asp-for="Employee.ID" />
            <span asp-validation-for="Employee.ID"></span>
        </div>
    </div>
    <div>
        <input type="submit" value="Add as Manager" asp-page-handler="JoinManager" />
        <input type="submit" value="Add as Employee" asp-page-handler="JoinEmployee"/>
    </div>
</form>
Note that we have two different submit buttons. Each submit button must have an asp-page-handler attribute that specifies a unique name; that name is used to locate the correct page handler.
To demonstrate that we do not need to have a code-behind class, let's delete the Add.cshtml.cs file and include this page's functionality directly in the page itself. We will use two methods: OnPostJoinManagerAsync() and OnPostJoinEmployeeAsync().
To include C# model in a Razor Page, you use the @functions directive, like so:
@functions
{
    [TempData]
    public string Message { get; set; }

    [BindProperty]
    public Employee Employee { get; set; }

    public async Task<IActionResult> OnPostJoinManagerAsync()
    {
        if (!ModelState.IsValid)
        {
            return Page();
        }

        Message = Employee.FirstName + " " + Employee.LastName + " (ID " + Employee.ID.ToString() + ") would have been added as a Manager.";

        return RedirectToPage("Index");
    }

    public async Task<IActionResult> OnPostJoinEmployeeAsync()
    {
        if (!ModelState.IsValid)
        {
            return Page();
        }

        Message = Employee.FirstName + " " + Employee.LastName + " (ID " + Employee.ID.ToString() + ") would have been added as an Employee.";

        return RedirectToPage("Index");
    }
}
Each of the page actions will check the ModelState to see if it is valid, just like in any other MVC application. However, the return method from these actions is now either Page() or RedirectToPage(), methods which were added to ASP.NET Core MVC in version 2.0.
Finally, note the naming of each method. Remember that we had two submit buttons, named JoinManager and JoinEmployee. The methods are correspondingly named OnPostJoinManagerAsync() and OnPostJoinEmployeeAsync().
NOTE: In this demo, we create a Message rather than actually adding an employee to the data source, since we are mocking the source.
Now that we've got our Add page, let's build an Edit page.
Building the Edit Page
Just like with the Add page, we'll add a new Razor Page called Edit. This time, though, we will leave the Edit.cshtml.cs file alone.
In that file, we need to change the model to load the given Employee from the data source.
public class EditModel : PageModel
{
    private IEmployeeRepository _employeeRepo;

    public EditModel(IEmployeeRepository employeeRepo)
    {
        _employeeRepo = employeeRepo;
    }

    [TempData]
    public string Message { get; set; }

    [BindProperty]
    public Employee Employee { get; set; }

    public async Task<IActionResult> OnGetAsync(int id)
    {
        Employee = _employeeRepo.GetByID(id);

        if(Employee == null)
        {
            return RedirectToPage("Index");
        }

        return Page();
    }

    public async Task<IActionResult> OnPostAsync()
    {
        if(!ModelState.IsValid)
        {
            return Page();
        }

        Message = Employee.FirstName + " " + Employee.LastName + ", ID " + Employee.ID.ToString() + " would have been saved.";

        return RedirectToPage("Index");
    }
}
This model fits with the needed markup:
@page "{id:int}"
@model ASPNETCoreRazorPagesDemo.Pages.Employees.EditModel

<h2>Add an Employee</h2>
<a asp-page="Index">Back to Employees</a>

<form method="post">
    <div>
        <div>
            <label asp-for="Employee.FirstName"></label>
            <input type="text" asp-for="Employee.FirstName" />
            <span asp-validation-for="Employee.FirstName"></span>
        </div>
        <div>
            <label asp-for="Employee.LastName"></label>
            <input type="text" asp-for="Employee.LastName" />
            <span asp-validation-for="Employee.LastName"></span>
        </div>
        <div>
            <label asp-for="Employee.DateOfBirth"></label>
            <input type="text" asp-for="Employee.DateOfBirth" />
            <span asp-validation-for="Employee.DateOfBirth"></span>
        </div>
        <div>
            <label asp-for="Employee.ID"></label>
            <input type="text" asp-for="Employee.ID" />
            <span asp-validation-for="Employee.ID"></span>
        </div>
    </div>
    <div>
        <input type="submit" value="Submit" />
    </div>
</form>
Because we only have one submit button on this form, we only need OnGet() and OnPost().
Routing
I want to call special attention to how Routing is accomplished in Razor Pages. A lot of it has to do with defaults and standards, not all of which I feel are intuitive.
First, if you want to include data in your route that needs to be passed to the page, you modify the @page directive in the .cshtml file. On our Edit page, it looks like this:
@page "{id:int}"
The string after the @page directive is the part of the route that comes after the route to the page. Since our Edit page is at Employees/Edit, the full route will now be /Employees/Edit/2.
Next, we should point out how RedirectToPage() works. Here's the call from our Add page:
return RedirectToPage("Index");
If a page called Index exists in the folder where this line is called, the user will be redirected to that page. If no such page exists, ASP.NET Core will throw an exception. It is now possible to have a single route which maps to two different pages; in this case, ASP.NET Core will throw an AmbiguousActionException.
There are other fancy things we can do with routing in Razor Pages, such as friendly URLs, but I'll leave those for another post. :)
Features of Razor Pages
As I mentioned earlier, Razor Pages are built on top of ASP.NET Core MVC. But they also have a few innate features that make them better suited to building page-focused scenarios:
- Anti-forgery tokens are automatically included on every Razor Page.
- ViewModels are no longer a thing, because the PageModel replaces them.
- Razor Pages have greater cohesiveness than normal MVC sites, because all the data related to a page is on a file that's physically related to that page (whereas in MVC you could have a Controller, a ViewModel, a View, and a Model of some kind that are all pieces of the same action).
Summary
Razor Pages are a new feature in ASP.NET Core 2.0 that allows developers to build page-focused applications quickly while keeping all data relative to the page in close proximity to the page. I stand by the assertion that Razor Pages are WebForms done right, and you even get all the MVC goodness included, free of charge!
In short, Razor Pages are a wonderful tool in our developer toolbox for building page-focused applications.
Do you see a bug I missed? Did I forget to include your favorite feature of Razor Pages? Do you just need to tell me something? Let me know in the comments!
Oh, and bonus points to anyone who can tell me what TV show the sample employees are from (without using Google).
Happy Coding!


