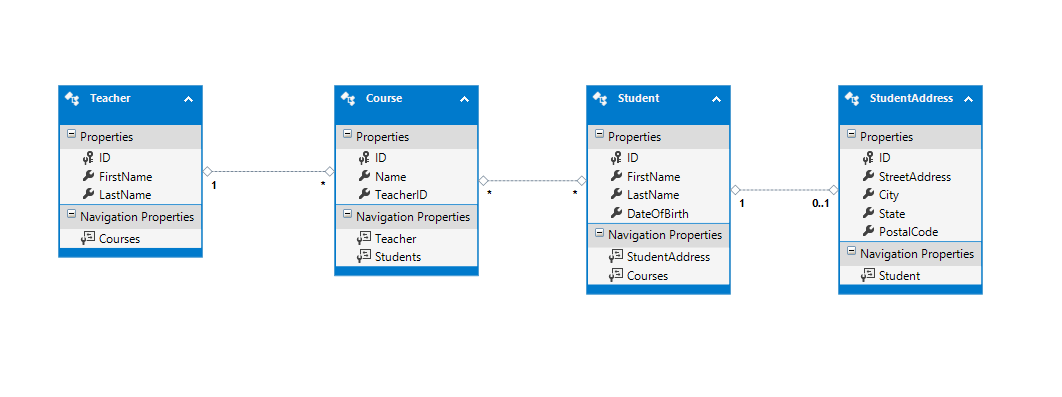
In previous posts we have created a database-first model, created a model-first model using an EDMX, and created a code-first model from an existing database. In this post, we will create a code-first model from scratch using DataAnnotations; in a later post we will create the same model using FluentAPI, and in another post we will demonstrate how to manage changes to your database schema using Code-First Migrations.
For now, let's build a code first model using attributes!
Creating the Model
We want to create the same model we used in the Model-First demo, which looked like this:

Student
Let's begin by creating the Student class. The framework of the class looks like this:
public partial class Student
{
    public int ID { get; set; }
    public string FirstName { get; set; }
    public string LastName { get; set; }
    public DateTime DateOfBirth { get; set; }
}
However, we will need to add some data annotations in order to tell Entity Framework about the properties ID, FirstName, LastName, and DateOfBirth.
Let's start with ID. We want that to be the key column for the generated table, and we want it to be a database-generated IDENTITY. We can specify both of those things using attributes:
public partial class Student
{
    [Key]
    [DatabaseGenerated(DatabaseGeneratedOption.Identity)]
    public int ID { get; set; }

    public string FirstName { get; set; }
    public string LastName { get; set; }
    public DateTime DateOfBirth { get; set; }
}
Let's also say that FirstName and LastName cannot be null and must be less than 100 characters. We can also do that using attributes:
public partial class Student
{
    [Key]
    [DatabaseGenerated(DatabaseGeneratedOption.Identity)]
    public int ID { get; set; }

    [Required]
    [StringLength(100)]
    public string FirstName { get; set; }

    [Required]
    [StringLength(100)]
    public string LastName { get; set; }

    public DateTime DateOfBirth { get; set; }
}
StudentAddress
Now we have our Student class defined, let's define the class for StudentAddress:
public class StudentAddress
{
    [Key]
    [DatabaseGenerated(DatabaseGeneratedOption.Identity)]
    public int ID { get; set; }

    [Required]
    public string StreetAddress { get; set; }

    [Required]
    public string City { get; set; }

    [Required]
    public string State { get; set; }

    [Required]
    public string PostalCode { get; set; }

    public int StudentID { get; set; }

    [ForeignKey("StudentID")]
    public virtual Student Student { get; set; }
}
Check out the ForeignKeyAttribute, which is used to specify a foreign key property in the current class (StudentAddress) that references the targeted class (Student).
We also need to add the following property to Student:
public virtual StudentAddress Address { get; set; }
Note that the two relationship properties are marked virtual. This is so Entity Framework can implement Lazy Loading on this relationship; without the virtual keyword, EF would always load the related entities.
Teacher
Now we can define the Teacher class:
public class Teacher
{
    [Key]
    [DatabaseGenerated(DatabaseGeneratedOption.Identity)]
    public int ID { get; set; }

    [Required]
    [StringLength(100)]
    public string FirstName { get; set; }

    [Required]
    [StringLength(100)]
    public string LastName { get; set; }
}
Course
Finally, we can define the Course class:
public class Course
{
    [Key]
    [DatabaseGenerated(DatabaseGeneratedOption.Identity)]
    public int ID { get; set; }

    [Required]
    public string Name { get; set; }

    public virtual ICollection<Student> Students { get; set; }

    public int TeacherID { get; set; }

    [ForeignKey("TeacherID")]
    public virtual Teacher Teacher { get; set; }
}
Remember, though, that in order for the relationship to be completed on each side (Teacher 1-to-n Courses, and Courses m-to-n Students), we need to modify the Teacher and Student classes:
In the Teacher class, we add a collection of Courses they will be teaching:
public virtual ICollection<Course> Courses { get; set; }
In the Student class, we add a collection of courses they will be attending:
public virtual ICollection<Course> Courses { get; set; }
The Context
With all of our entity classes in place, it is now time to build the context. We'll call it CourseCatalogContext, and it will need to inherit from DbContext:
public class CourseCatalogContext : DbContext
{
}
Now, all we need to do is add the DbSets for the entities:
public class CourseCatalogContext : DbContext
{
    public virtual DbSet<Student> Students { get; set; }
    public virtual DbSet<StudentAddress> StudentAddresses { get; set; }
    public virtual DbSet<Course> Courses { get; set; }
    public virtual DbSet<Teacher> Teachers { get; set; }
}
Ta-da! We've got our context created and ready to use. Since we're using attributes, that's all we need to do in order to create our context; if we needed to implement this in an empty database, we could do using Code-First Migrations, which we will demo in a later post. For now, just sit back and enjoy the fact that you created your first Code-First model!
Don't forget to check out the sample project on GitHub, and happy coding!


