I've mentioned before that I work in the Internal Tools group at my job, and because of this we end up building a lot of line-of-business apps. in short, we build web apps that allow other people to do their job more efficiently.
Lately we've been having a lot of requests to build something like a CheckBoxList control from WebForms in our MVC projects. We didn't really have any default way in MVC to handle this kind of thing, so we decided (like all good programmers) to roll our own. So, here it is, and feel free to let us know in the comments how it works for you!
The Sample Project
Here's a sample project on GitHub that demonstrates the CheckBoxList we're going to build in this post.
Setting up CheckBoxListItem
The first problem we had to tackle was that we wanted our check box list control to be reusable. Because of this, we needed to think about what comprised a checkbox, and we came up with three attributes of a checkbox:
- An ID
- Text to display
- A boolean for whether the box is checked or not
Which leads directly to a C# class CheckBoxListItem:
public class CheckBoxListItem
{
    public int ID { get; set; }
    public string Display { get; set; }
    public bool IsChecked { get; set; }
}
Now we needed a way to display the checkboxes to the user. After searching for a little bit, we settled on using EditorTemplates, which provide a way to associate a partial view to a class or primitive type.

To use EditorTemplates (by default, this can be configured), we need to place those partial views within an EditorTemplates folder in the Views/Shared folder and name the partial view after the type it will display: "CheckBoxListItem.cshtml".
That partial view looks like this:
@model CheckBoxListDemo.Web.Models.CheckBoxListItem

@Html.HiddenFor(x => x.ID)
@Html.CheckBoxFor(x => x.IsChecked)
@Html.LabelFor(x => x.IsChecked, Model.Display)
<br />
The Movies Database
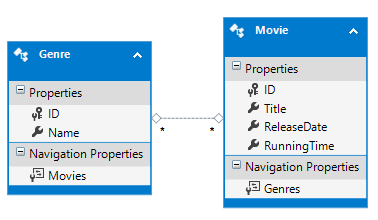
Now that we've got the setup done, we can get started actually using this thing. Let's pretend we're building a database of movies, with their genres. For this example, assume one move can be in multiple genres, and one genre (obviously) has multiple movies. Therefore, our database (as modeled by Entity Framework) will look like this:

Adding a Movie
Now, let's say we want to create a view to add a movie. To get the title, running time, and release date on the view, we'll use the the view model class AddMovieVM and the view "Movie/Add.cshtml":
public class AddMovieVM
{
    [DisplayName("Title: ")]
    public string Title { get; set; }

    [DisplayName("Release Date: ")]
    [DataType(DataType.Date)]
    [DisplayFormat(DataFormatString = "{0:yyyy-MM-dd}",
                   ApplyFormatInEditMode = true)]
    public DateTime ReleaseDate { get; set; }

    [DisplayName("Running Time (Minutes):")]
    public int RunningTimeMinutes { get; set; }

    public List<CheckBoxListItem> Genres { get; set; }

    public AddMovieVM()
    {
        Genres = new List<CheckBoxListItem>();
    }
}
@model CheckBoxListDemo.Web.ViewModels.Movie.AddMovieVM
...
@using (Html.BeginForm())
{
    <div>
        <div>
            @Html.LabelFor(x => x.Title)
            @Html.TextBoxFor(x => x.Title)
        </div>
        <div>
            @Html.LabelFor(x => x.ReleaseDate)
            @Html.EditorFor(x => x.ReleaseDate)
        </div>
        <div>
            @Html.LabelFor(x => x.RunningTimeMinutes)
            @Html.TextBoxFor(x => x.RunningTimeMinutes)
        </div>
        <div>
            @Html.EditorFor(x => x.Genres)
        </div>
        <input type="submit" value="Go!" />
    </div>
}
Notice that we've defined Genres as a List<CheckBoxListItem>, so in the MovieController controller we will need to create that list and assign it to the view model:
[HttpGet]
public ActionResult Add()
{
    AddMovieVM model = new AddMovieVM();
    var allGenres = GenreManager.GetAll(); //returns List<Genre>
    var checkBoxListItems = new List<CheckBoxListItem>();
    foreach (var genre in allGenres)
    {
        checkBoxListItems.Add(new CheckBoxListItem()
        {
            ID = genre.ID,
            Display = genre.Name,
            IsChecked = false //On the add view,
                              //no genres are selected by default
        });
    }
    model.Genres = checkBoxListItems;
    return View(model);
}
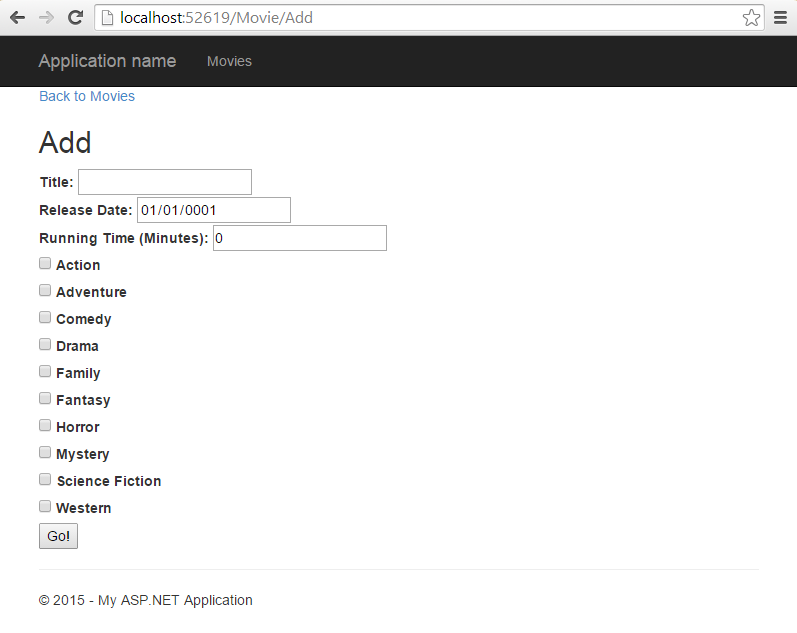
When we run the app, it will render a page that looks like this:

Great! Now we can select any Genre that applies to the movie we are adding. But how do we save the selected Genres in the post action?
Saving Selected Genres
Let's say we have a class MovieManager, and in this class we we have a method Add() which adds a new movie to our database.
DataAccess/Managers/MovieManager.cs
public static void Add(string title,
                       DateTime releaseDate,
                       int runningTime,
                       List<int> genres)
{
    using (MovieEntities context = new MovieEntities())
    {
        var movie = new Movie()
        {
            Title = title,
            ReleaseDate = releaseDate,
            RunningTime = runningTime
        };

        foreach (var genreID in genres)
        {
            var genre = context.Genres.Find(genreID);
            movie.Genres.Add(genre);
        }
        context.Movies.Add(movie);

        context.SaveChanges();
    }
}
All this is doing is associating the Genre and Movie objects together based on a List<int> of the selected Genre IDs. In the MovieController's POST action, we can now do this:
[HttpPost]
public ActionResult Add(AddMovieVM model)
{
    var selectedGenres = model.Genres
                              .Where(x => x.IsChecked)
                              .Select(x => x.ID).ToList();

    MovieManager.Add(model.Title,
                     model.ReleaseDate,
                     model.RunningTimeMinutes,
                     selectedGenres);

    return RedirectToAction("Index");
}
Notice that the POST action assumes the Genres property has values, which is due to how we defined our CheckBoxListItem.cshtml view (specifically the hidden field for ID).
Editing a Movie
The scenario for editing a movie is very similar, the only real difference is that the GET action on the MovieController needs to mark genres that are already associated to the movie as checked:
[HttpGet]
public ActionResult Edit(int id)
{
    var movie = MovieManager.GetByID(id);
    var model = new EditMovieVM()
    {
        ID = movie.ID,
        ReleaseDate = movie.ReleaseDate,
        RunningTimeMinutes = movie.RunningTime,
        Title = movie.Title
    };
    var movieGenres = GenreManager.GetForMovie(id);
    var allGenres = GenreManager.GetAll();
    var checkBoxListItems = new List<CheckBoxListItem>();
    foreach (var genre in allGenres)
    {
        checkBoxListItems.Add(new CheckBoxListItem()
        {
            ID = genre.ID,
            Display = genre.Name,
            //We should have already-selected genres be checked
            IsChecked = movieGenres.Where(x => x.ID == genre.ID).Any()
        });
    }
    model.Genres = checkBoxListItems;
    return View(model);
}
Grab the Sample Project!
I've put a sample project, including a SQL Server local database and data-access methods, on GitHub. Check it out!
Happy Coding!


