Anyone who works with ASP.NET Web API should check out this poster that Microsoft created to explain the Request/Response Pipeline that Web API utilizes. It's amazing, and if you do any work in Web API you should check it out! Right now. Yes, seriously. Go ahead, I'll wait.
I love this poster, but in my opinion it doesn't do a good job of explaining the decision logic and ideas behind each step in the pipeline. Further, it doesn't explicitly tell you exactly how many things happen during this pipeline (answer: a surprisingly large number of things). In short: it's awesome, but it can be made more awesome by incorporating just a little more detail.
Here's what we're going to do in this post: using that poster, we're going to enumerate every single step involved in processing a request and receiving a response using ASP.NET Web API 2, and explain a little more about each piece of the pipeline and where we programmers can extend, change, or otherwise make more awesome this complex lifecycle. So let's get going and step through the ASP.NET Web API 2 Request Lifecycle in just 43 easy steps!
The 43 Steps
It all starts with IIS:
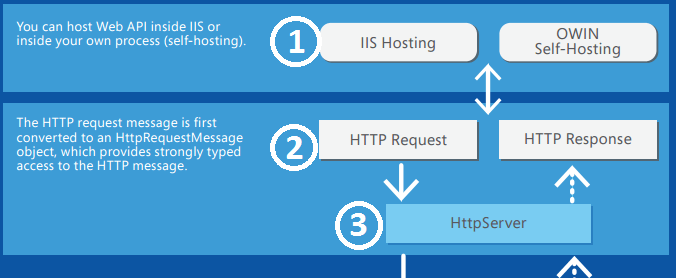
- IIS (or OWIN self-hosting) receives a request.
- The request is then passed to an instance of HttpServer.

- HttpServer is responsible for dispatching HttpRequestMessage objects.
- HttpRequestMessage provides strongly-typed access to the request.
-
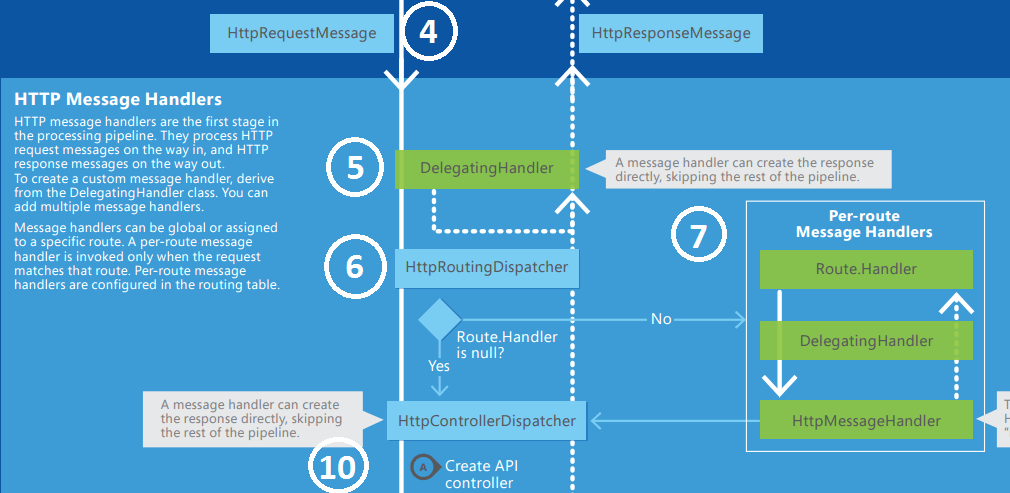
If one or more global instances of DelegatingHandler exist on the pipeline, the request is passed to it. The request arrives at the instances of DelegatingHandler in the order said instances were added to the pipeline.
- DelegatingHandler instances can skip the remainder of the pipeline and create their own response. I do exactly this in my Custom Validation with FluentValidation post.
-
If the HttpRequestMessage passes the DelegatingHandler instances (or no such handler exists), then the request proceeds to the HttpRoutingDispatcher instance.
- HttpRoutingDispatcher chooses which routing handler to call based on the matching route. If no such route exists (e.g. Route.Handler is null, as seen in the diagram) then the request proceeds directly to Step 10.
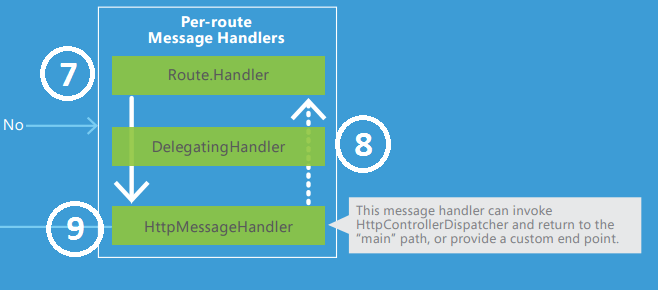
- If a Route Handler exists for the given route, the HttpRequestMessage is sent to that handler.
- It is possible to have instances of DelegatingHandler attached to individual routes. If such handlers exist, the request goes to them (in the order they were added to the pipeline).
- An instance of HttpMessageHandler then handles the request. If you provide a custom HttpMessageHandler, said handler can optionally return the request to the "main" path or to a custom end point.

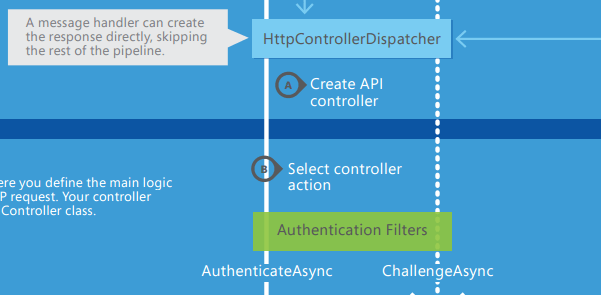
- The request is received by an instance of HttpControllerDispatcher, which will route the request to the appropriate route as determined by the request's URL.
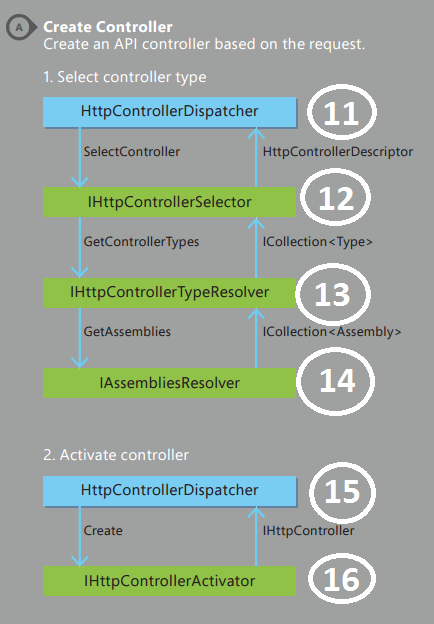
- The HttpControllerDispatcher selects the appropriate controller to route the request to.
- An instance of IHttpControllerSelector selects the appropriate HttpControllerDescriptor for the given HttpMessage.
- The IHttpControllerSelector calls an instance of IHttpControllerTypeResolver, which will finally call...
- ...an instance of IAssembliesResolver, which ultimately selects the appropriate controller and returns it to the HttpControllerDispatcher from Step 11.
- NOTE: If you implement Dependency Injection, the IAssembliesResolver will be replaced by whatever container you register.
- Once the HttpControllerDispatcher has a reference to the appropriate controller, it calls the Create() method on an IHttpControllerActivator...
- ...which creates the actual controller and returns it to the Dispatcher. The dispatcher then sends the request into the Select Controller Action routine, as shown below.
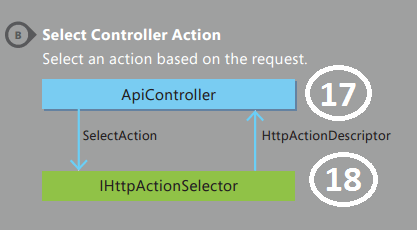
- We now have an instance of ApiController which represents the actual controller class the request is routed to. Said instance calls the SelectAction() method on IHttpActionSelector...
- ...which returns an instance of HttpActionDescriptor representing the action that needs to be called.
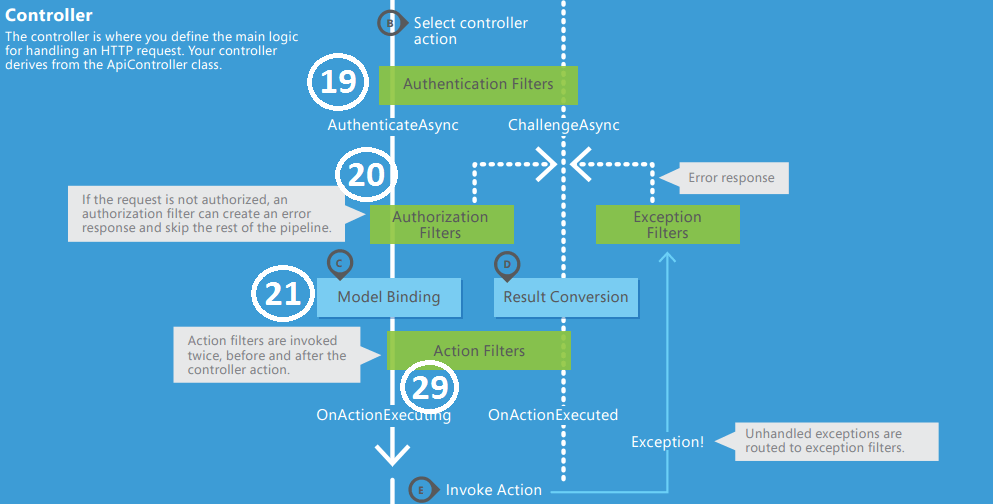
- Once the pipeline has determined which action to route the request to, it executes any Authentication Filters which are inserted into the pipeline (either globally or local to the invoked action).
- These filters allow you to authenticate requests to either individual actions, entire controllers, or globally throughout the application. Any filters which exist are executed in the order they are added to the pipeline (global filters first, then controller-level filters, then action-level filters).
- The request then proceeds to the [Authorization Filters] layer, where any Authorization Filters which exist are applied to the request.
- Authorization Filters can optionally create their own response and send that back, rather than allowing the request to proceed through the pipeline. These filters are applied in the same manner as Authentication Filters (globally, controller-level, action-level). Note that Authorization Filters can only be used on the Request, not the Response, as it is assumed that if a Response exists, the user had the authorization to generate it.
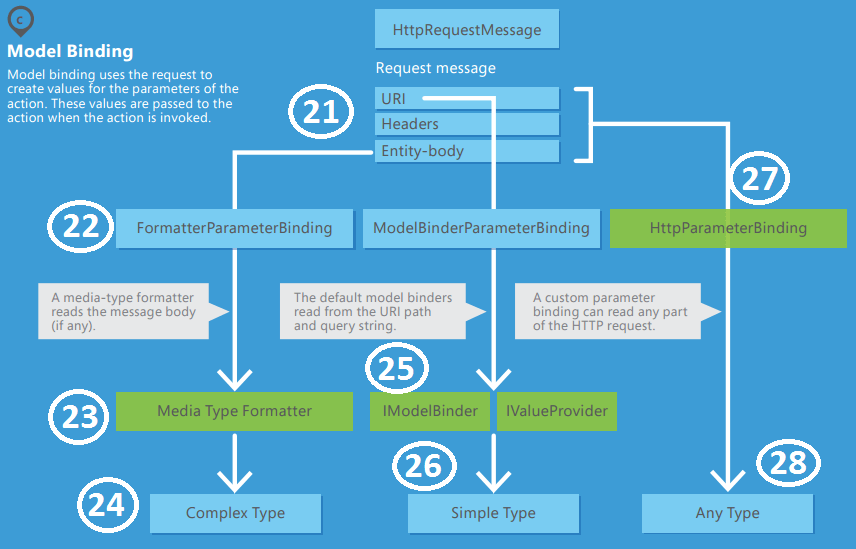
- The request now enters the Model Binding process, which is shown in the next part of the main poster. Each parameter needed by the action can be bound to its value by one of three separate paths. Which path the binding system uses depends on where the value needed exists within the request.
-
If data needed for an action parameter value exists in the entity body, Web API reads the body of the request; an instance of FormatterParameterBinding will invoke the appropriate formatter classes...
-
...which bind the values to a media type (using MediaTypeFormatter)...
-
...which results in a new complex type.
-
If data needed for a parameter value exists in the URL or query string, said URL is passed into an instance of IModelBinder, which uses an IValueProvider to map values to a model (see Phil Haack's post about this topic for more info)....
-
...which results in a simple type.
-
If a custom HttpParameterBinding exists, the system uses that custom binding to build the value...
-
...which results in any kind (simple or complex) of object being mappable (see Mike Stall's wonderful series on this topic).

- Now that the request is bound to a model, it is passed through any Action Filters which may exist in the pipeline (either globally or just for the action being invoked).
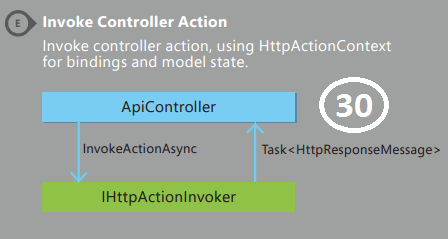
- Once the action filters are passed, the action itself is invoked, and the system waits for a response from it.
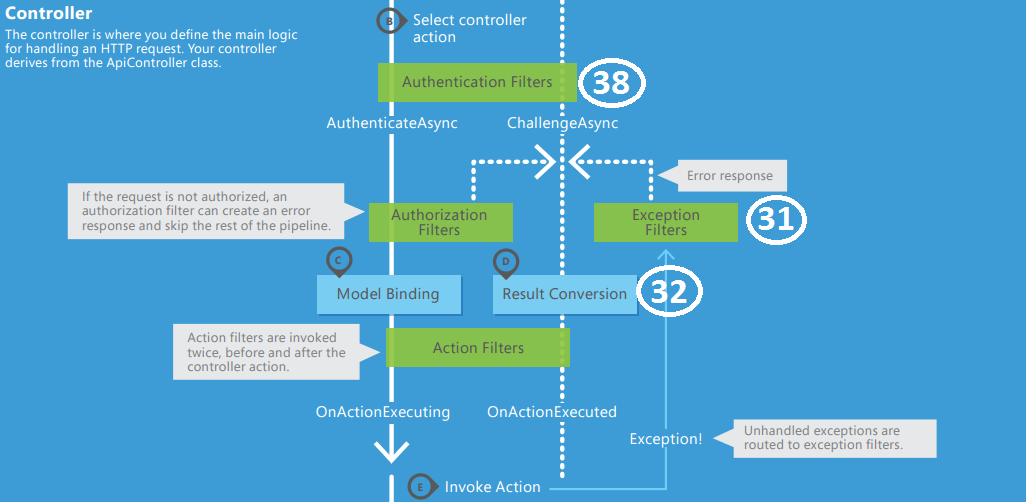
-
If the action produces an exception AND an exception filter exists, the exception filter receives and processes the exception.
-
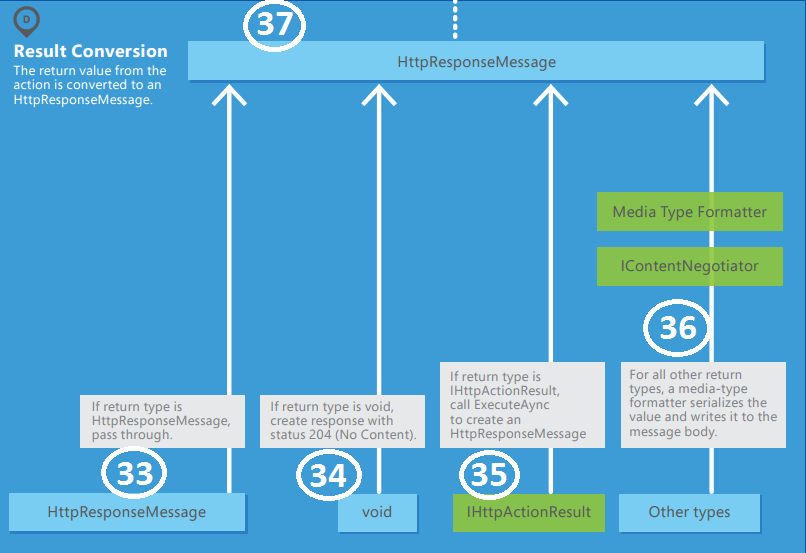
If no exception occurred, the action produces an instance of HttpResponseMessage by running the Result Conversion subroutine, shown in the next screenshot.
-
If the return type is already an HttpResponseMessage, we don't need to do any conversion, so pass the return on through.
-
If the return type is void, .NET will return an HttpResponseMessage with the status 204 No Content.
-
If the return type is an IHttpActionResult, call the method ExecuteAsync to create an HttpResponseMessage.
- In any Web API method in which you use
return Ok();orreturn BadRequest();or something similar, that return statement follows this process, rather than any of the other processes, since the return type of those actions is IHttpActionResult.
-
For all other types, .NET will create an HttpResponseMessage and place the serialized value of the return in the body of that message.
-
Once the HttpResponseMessage has been created, return it to the main pipeline.

- Pass the newly-created HttpResponseMessage through any AuthenticationFilters which may exist.
-
Remember that Authorization Filters cannot be used on Responses.

-
The HttpResponseMessage flows through the HttpControllerDispatcher, which at this point probably won't do anything with it.
-
The Response also flows through the HttpRoutingDispatcher, which again won't do anything with it.
-
The Response now proceeds through any DelegatingHandlers that are set up to handle it. At this point, the DelegatingHandler objects can really only change the response being sent (e.g. intercept certain responses and change to the appropriate HTTP status).
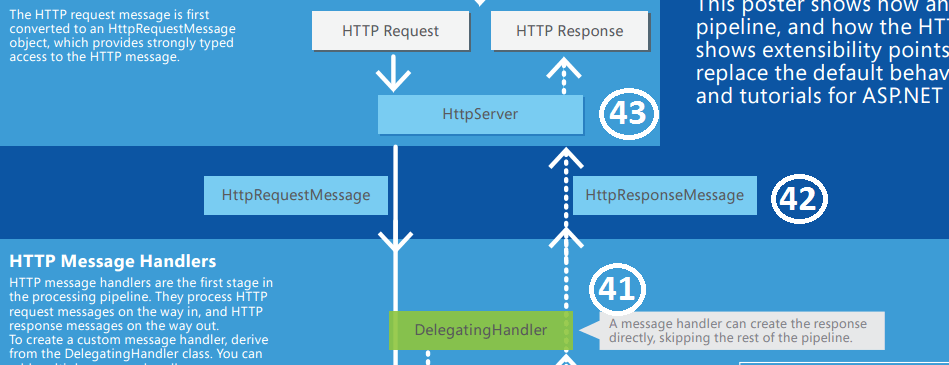
-
The final HttpResponseMessage is given to the HttpServer instance...
-
...which returns an Http response to the invoking client.
Tada! We've successfully walked through the entire Web API 2 request/response pipeline, and in only 43 easy steps!
Let me know if this kind of deep dive has been helpful to you, and feel free to share in the comments! Microsoft people and other experts, please chime in to let me know if I got something wrong; I intend for this post to be the definitive guide to the Web API 2 Request/Response Lifecycle, and you can't be definitive without being correct.
Happy Coding!


