

One of my secret dreams is coming true: we will soon be able to write C# code and have it run in the browser!

This is due to a formerly-experimental, but now officially supported web framework called Blazor. In this tutorial, we'll learn what Blazor is, and build a sample app to demonstrate how to use it. I swear this is not a dream. Let's get going!
What Is Blazor?
Blazor is an web framework that allows us to write C# and HTML to create client-side single-page applications. In practice, it looks very similar to Razor Pages applications.
The written C# is then compiled down to a standard called WebAssembly, which allows for use on all modern browsers. Using Blazor, we are now able to create client-side applications using C# and .NET Core.
An Announcement
When I started writing this post, Blazor was an experimental framework. It was only recently (18 April 2019) that Microsoft announced that it will be an officially supported framework in .NET Core in the future. As someone who's been interested in client-side applications for a long time but really doesn't like JavaScript, I cannot tell you how excited I am by this development.
Without further ado, let's build our first Blazor app!
The Setup
You must be running Visual Studio 2019 in order to develop a Blazor app, but there's also other things we must included. Blazor is not included by default in either VS 2019 or ASP.NET Core 2.1, so we need to go download the appropriate templates and SDKs.
The Sample App
As I do with most of my code-focused posts, I created a sample application that is hosted over on GitHub and demonstrates the code in this post. Check it out!

Breaking Down Blazor
Let's take a look at some of the files present in a basic Blazor app.
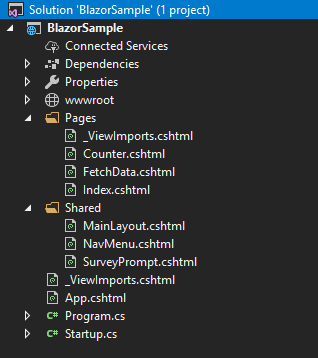
- Dependencies, Properties, and wwwroot folders are the same as in a standard ASP.NET Core application.
- The Pages folder contains the pages that comprise this app, just like a Razor Pages app.
- The Shared folder contains the layout pages that apply to the entire app.
- The _ViewImports.cshtml file is used to import namespaces into other *.cshtml files.
- The Program.cs file is used to create the ASP.NET Core hosting environment.
- The Startup.cs file is used to create the Blazor project settings and dependencies.
- The App.cshtml file is the only one (AFAIK) that's specific to Blazor. Blazor ships with a client-side router that is quite limited compared to, say, Angular. However, it works fine in my program, and probably works OK for other simple apps. This page enables that router.
If you run the sample app, you get a page that looks like this:
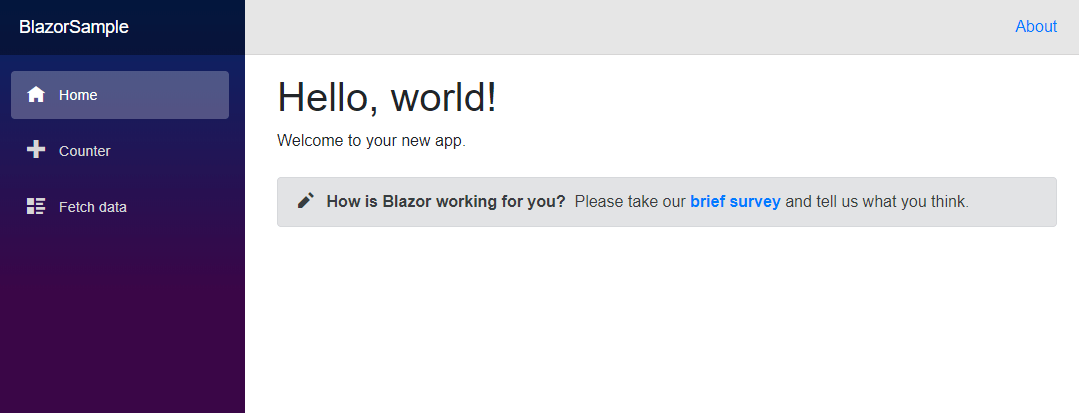
This is a fully client-side application, running from C# code that has been transpiled to Web Assembly. If you try going to the Counter or Fetch Data example pages, you'll see how snappy it is, and how nice it feels to navigate around it.
But we didn't come here to see the sample app that Visual Studio can generate for us. We came here to build our own page. Let's do that.
Adding a To Do List
We're going to add a new page to this sample project and make it a very simple To-Do list. To do that, we're going to need three parts.
- A set of sample data that the page initially loads.
- A new page which hosts the To-Do list.
- A set of functions on that page which will add, delete, and toggle "completed" status of the To-Do items.
The first one is the easiest. Under the wwwroot folder, there is a /sample-data folder. Let's add a new JSON file called todoitems.json to that folder. The file looks like this:
[
  {
    "id": "f0dcda47-1f23-4538-92e0-a47dcdcc7850",
    "description": "Read this tutorial",
    "iscomplete": false,
    "datecreated": "2019-04-11"
  },
  {
    "id": "d21b0f7e-a5a9-45ee-ad9b-eafd911e22fa",
    "description": "Build my own Blazor app",
    "iscomplete": false,
    "datecreated": "2019-04-11"
  }
]
Note: we are using GUIDs for the ID field because it makes it much easier to generate new ones, since we don't have a database (and partially because I'm lazy).
Now we need a ToDo.cshtml page. Normally I would right-click the Pages folder and select Add -> Razor Page, but the scaffolding appears to be broken for this feature at time of writing. What I did instead was copy one of the already-existing Pages and erase everything except for the following:
@page "/todo"
@inject HttpClient Http

<h1>To-Do List</h1>
Let's look more closely at the directives used on this page:
@pageis a directive which tells ASP.NET that this is a Razor Page AND sets the default route. In our case the route is the relative route "/todo". This parameter accepts both relative and absolute routes; the latter would be something like "~/Path/To/Page". You can have multiple@pagedirectives for multiple routes.- The
@injectdirective tells Blazor to use Dependency Injection (DI) to inject a class to this page. In our case, we are injecting HttpClient so we can read from the sample data we created earlier.
Since we now have a way to read and view the sample data, we need to define the C# class which represents a To-Do list item, and define a method by which we can load the sample data. For this, we need the @functions directive. On the same page:
@functions{
    IList<ToDoItem> items = new List<ToDoItem>();

    protected override async Task OnInitAsync()
    {
        items = await Http.GetJsonAsync<List<ToDoItem>>
                      ("sample-data/todoitems.json");
    }

    class ToDoItem
    {
        public Guid ID { get; set; }
        public string Description { get; set; }
        public bool IsComplete { get; set; }
        public DateTime DateCreated { get; set; }
    }
}
The real magic here is the OnInitAsync() method. This method fires when the page is loaded into the browser. In our implementation, all it does is get the JSON sample data and convert that to our newly-defined ToDoItem class.
The next step is to add the HTML necessary to render a table of To-Do list items. Here's that HTML:
@if (items == null)
{
    <p><em>Loading...</em></p>
}
else if (!items.Any())
{
    <p><em>No ToDo items exist.  Please add some.</em></p>
}
else
{
    <table class="table">
        <thead>
            <tr>
                <th>Date</th>
                <th>Description</th>
                <th>Is Complete</th>
            </tr>
        </thead>
        <tbody>
            @foreach (var item in items)
            {
                <tr>
                    <td>@item.DateCreated</td>
                    <td>@item.Description</td>
                    <td>@item.IsComplete</td>
                </tr>
            }
        </tbody>
    </table>
}
Notice the @if clauses. We check to see if our List<ToDoItem> is null, because if it is, it hasn't been loaded from the data source yet, and so we show an appropriate error message. If the List<ToDoItem> is NOT null but is empty, we show a different error. Otherwise we render the table of To-Do list items.
There's one last thing we need to do in order to use this page: we need to add a new item to the main navigation. On the NavMenu.cshtml page:
<div class="@NavMenuCssClass" onclick="@ToggleNavMenu">
    <ul class="nav flex-column">
        <li class="nav-item px-3">
            <NavLink class="nav-link" href="" Match="NavLinkMatch.All">
                <span class="oi oi-home" aria-hidden="true"></span> Home
            </NavLink>
        </li>
        <li class="nav-item px-3">
            <NavLink class="nav-link" href="counter">
                <span class="oi oi-plus" aria-hidden="true"></span> Counter
            </NavLink>
        </li>
        <li class="nav-item px-3"> <!-- here's the new item -->
            <NavLink class="nav-link" href="todo">
                <span class="oi oi-list" aria-hidden="true"></span> To-Do
            </NavLink>
        </li>
        <li class="nav-item px-3">
            <NavLink class="nav-link" href="fetchdata">
                <span class="oi oi-list-rich" aria-hidden="true"></span> Fetch data
            </NavLink>
        </li>
    </ul>
</div>
Now we can run the app, and see our page! It looks like this:
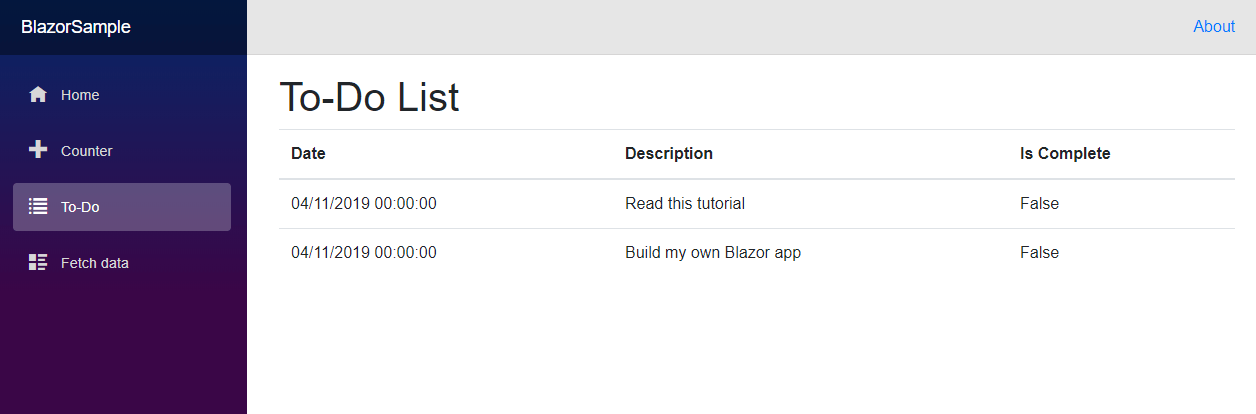
Woo-hoo! We got a working page that loads To-Do items from a sample JSON file! Now we can extend this page so that we can add, remove, and toggle the items.
Adding a New ToDoItem
To add a new ToDo item, we need an input on the page and a new method in the @functions directive.
First, let's add the input.
@if (items == null)
{
<p><em>Loading...</em></p>
}
else if (!items.Any())
{
<p><em>No ToDo items exist. Please add some.</em></p>
}
else
{
<table class="table">
...
</table>
}
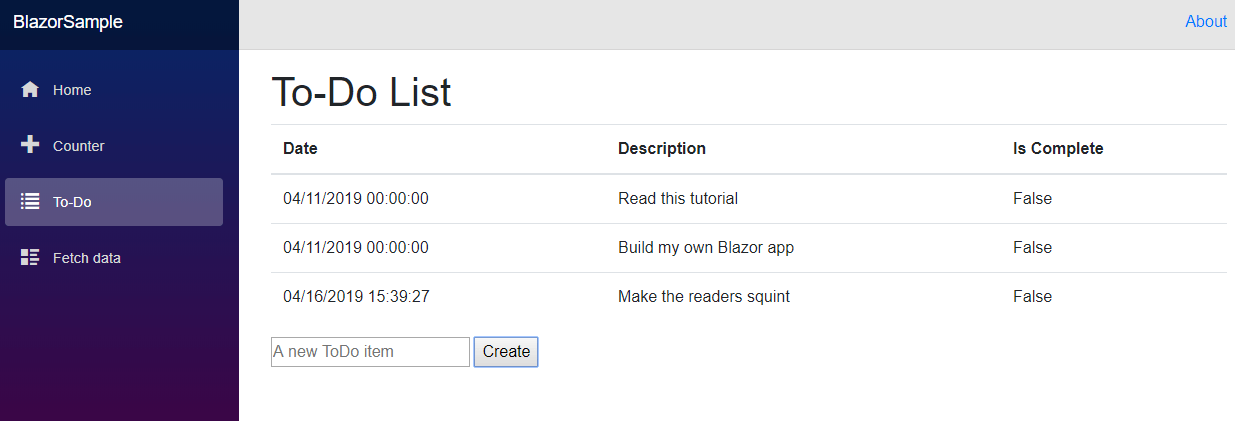
@if (items != null) //Here's the new input
{
<input placeholder="A new ToDo item" bind="@newItem" />
<button onclick="@AddTodo">Create</button>
}Notice the bind attribute. This is a feature of ASP.NET Core that allows us to bind HTML inputs to variables on our page. Similarly, ASP.NET Core allows us to bind onclick events to methods, as seen on the Create button.
We now need a new method called AddTodo():
@functions{
    IList<ToDoItem> items = new List<ToDoItem>();
    private string newItem;

    //...

    /// <summary>
    /// This method adds a new ToDo item.
    /// </summary>
    private void AddTodo()
    {
        if (!string.IsNullOrWhiteSpace(newItem))
        {
            items.Add(new ToDoItem()
            {
                DateCreated = DateTime.Now,
                Description = newItem,
                ID = Guid.NewGuid()
            });

            newItem = string.Empty; //We need to reset this string,
                                    //otherwise the text box
                                    //will still contain the value typed in.
        }
    }

    //...

}
With some simple validation, and the binding to the button's onclick event, our new method is ready. Let's add a new To-Do item!
All we need now is to add the Remove and Toggle methods.
Remove To-Do Items
Let's do the Remove methods first. Here's the modified HTML table:
<table class="table">
    <thead>
        <tr>
            <th>Remove</th>
            <th>Date</th>
            <th>Description</th>
            <th>Is Complete</th>
        </tr>
    </thead>
    <tbody>
        @foreach (var item in items)
        {
            <tr>
                <td><button onclick="@(() => RemoveTodo(item.ID))"><i class="oi oi-trash"></i></button></td>
                <td>@item.DateCreated</td>
                <td>@item.Description</td>
                <td>@item.IsComplete</td>
            </tr>
        }
    </tbody>
</table>
Note the onclick event bound to the HTML button. This event is bound to the C# method RemoveTodo(), which looks like this:
@functions{
    IList<ToDoItem> items = new List<ToDoItem>();

    //...

    private void RemoveTodo(Guid id)
    {
        items.Remove(items.First(x => x.ID == id));
    }

    //...
}
I was surprised at how simple this is. Of course, in real world apps, we would need a way to persist this change to the server somehow.
Toggle To-Do Items
Finally, let's include a way for us to toggle the property ToDoItem.IsComplete. Here's the modified HTML table and C# functions:
<table class="table">
    <thead>
        <tr>
            <th>Remove</th>
            <th>Date</th>
            <th>Description</th>
            <th>Is Complete</th>
        </tr>
    </thead>
    <tbody>
        @foreach (var item in items)
        {
            <tr>
                <td><button onclick="@(() => RemoveTodo(item.ID))"><i class="oi oi-trash"></i></button></td>
                <td>@item.DateCreated</td>
                <td>@item.Description</td>
                <td><input type=checkbox onchange="@(() => ToggleToDo(item.ID))" /> @item.IsComplete</td>
            </tr>
        }
    </tbody>
</table>
@functions{
IList<ToDoItem> items = new List<ToDoItem>();
private string newItem;
//...
private void ToggleToDo(Guid id)
{
//First find the item
var todo = items.First(x => x.ID == id);
todo.IsComplete = !todo.IsComplete;
}
//...
}If you run the app, you should now be able to remove and toggle any item in your To-Do list.
The Entire Page
For posterity, here's the entire ToDo page in my sample Blazor app:
@page "/todo"
@inject HttpClient Http

<h1>To-Do List</h1>

@if (items == null)
{
    <p><em>Loading...</em></p>
}
else if (!items.Any())
{
    <p><em>No ToDo items exist.  Please add some.</em></p>
}
else
{
    <table class="table">
        <thead>
            <tr>
                <th>Remove</th>
                <th>Date</th>
                <th>Description</th>
                <th>Is Complete</th>
            </tr>
        </thead>
        <tbody>
            @foreach (var item in items)
            {
                <tr>
                    <td><button onclick="@(() => RemoveTodo(item.ID))"><i class="oi oi-trash"></i></button></td>
                    <td>@item.DateCreated</td>
                    <td>@item.Description</td>
                    <td><input type=checkbox onchange="@(() => ToggleToDo(item.ID))" /> @item.IsComplete</td>
                </tr>
            }
        </tbody>
    </table>
}

@if (items != null)
{
    <input placeholder="A new ToDo item" bind="@newItem" />
    <button onclick="@AddTodo">Create</button>
}


@functions{
    IList<ToDoItem> items = new List<ToDoItem>();
    private string newItem;

    protected override async Task OnInitAsync()
    {
        items = await Http.GetJsonAsync<List<ToDoItem>>("sample-data/todoitems.json");
    }

    private void AddTodo()
    {
        if (!string.IsNullOrWhiteSpace(newItem))
        {
            items.Add(new ToDoItem()
            {
                DateCreated = DateTime.Now,
                Description = newItem,
                ID = Guid.NewGuid()
            });

            newItem = string.Empty; //We need to reset this string,
                                    //otherwise the text box will still
                                    //contain the value typed in.
        }
    }

    private void ToggleToDo(Guid id)
    {
        //First find the item
        var todo = items.First(x => x.ID == id);
        todo.IsComplete = !todo.IsComplete;
    }

    private void RemoveTodo(Guid id)
    {
        items.Remove(items.First(x => x.ID == id));
    }

    class ToDoItem
    {
        public Guid ID { get; set; }
        public string Description { get; set; }
        public bool IsComplete { get; set; }
        public DateTime DateCreated { get; set; }
    }
}
Pretty slick, yes?
Congratulations! We've written our first Blazor app!
Summary
Blazor is a client-side web framework that purports to allow us to use C# in client-side, single-page applications. It looks and feels very similar to Razor Pages apps. This sample project allows us to get ToDo list items from an external data source, add new items, remove items, and toggle items. All of this functionality happens client-side.
I cannot express how excited I am for Blazor to be officially included in .NET Core. C# in the browser? It seems my fever dream might actually come true. Or, at least, this one will.
Don't forget to check out the sample project on GitHub!
Happy Coding!